Create a cloud based noise level monitor using Analog Discovery PRO in Linux Mode
This guide runs through the steps required to send noise-level data captured by the Analog Discovery Pro up to the ThingSpeak cloud. The noise level measurements are visualized in four different ways on the ThingSpeak channel.
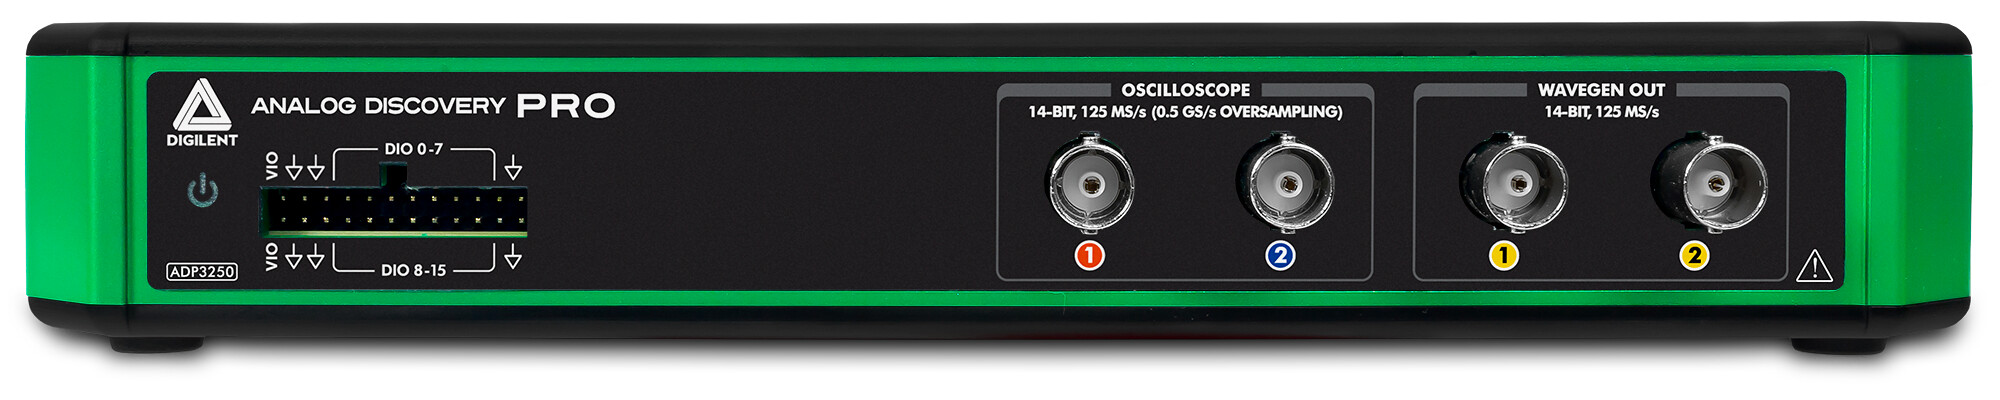
Analog Discovery Pro 3000 provides the utility of professional benchtop equipment with the flexibility of a portable instrument. t the heart of each device is a four or two-channel high-resolution oscilloscope, offering 14-bit resolution at up to 0.5 GS/s. Additionally, to meet the needs of an increasingly digital world, 16 dedicated digital channels make the Analog Discovery Pro a true mixed-signal oscilloscope. With the included digital power supply, digital outputs, two-channel arbitrary waveform generator, and two dedicated external triggers the Analog Discovery Pro come with 12 instruments ready to analyze mixed-signal systems through our free software, WaveForms.
The Pmod MIC3 is a MEMS Microphone powered by the Knowles Acoustics SPA2410LR5H-B microphone and the Texas Instruments ADCS7476 analog-to-digital converter. Users may adjust the incoming volume to the system board with the small potentiometer before they receive the 12 bits of data through SPI.
ThingSpeak, created by MathWorks, is an IoT analytics platform service that allows you to aggregate, visualize, and analyze live data streams in the cloud. You can send data to ThingSpeak from your device, create instant visualization of live data, and send alerts.
Hardware Setup
The Pmod M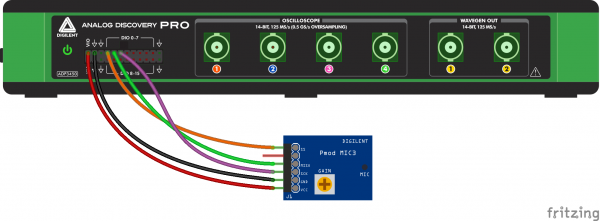 IC3 communicates on a SPI interface which will be connected to the Analog Discovery Pro’s digital I/O lines as follows: SS to DIO line 0, MISO to DIO 1, and SCK to DIO 2. Power to the Pmod is also supplied by the Analog Discovery Pro, so the VCC pin of the Pmod should be connected to the VIO pin on Analog Discovery Pro, and the grounds of the two devices should be connected together, as shown in the image at the left.
Connect Analog Discovery Pro to the Internet
The first step is to connect a serial terminal to the computer, which will be used later when logging into Linux mode. Make sure that the Analog Discovery Pro is connected to the host computer and powered on. Find out which serial port the computer is connected to and make note of it. Note that the serial connection should be established before booting into Linux mode, to ensure that no boot messages are missed.
Next, connect your device to the internet using one of the two methods below:
- Ethernet: Plug one end of the ethernet cable into the back of the Analog Discovery Pro and the other end into the router. If successfully connected to the local network it should be assigned an IP address, Gateway, etc.
- Plug the USB WiFi dongle into the bottom left USB port. Create the WIF, WSSID, and WPWD environment variables to be used in the command line. Note that it may take some time for a WiFi connection to be established when rebooting the device, potentially several minutes.
Now, the Analog Discovery is booted into Linux mode. Mode selection can be done through WaveForms using the Device Manager. With the Analog Discovery Pro connected to the host computer by Ethernet, open WaveForms. Select the Analog Discovery Pro from the device menu, then click the Boot button. Standard mode is set to default, to change to Linux Mode, select Linux, then click “Apply & Reboot”. About 10-15 seconds should pass before it reconnects.
Create Python script in WaveForms SDK
The script used for this project is written in Python and it contains the scripts used to control the Pmod MIC3, convert the measured data, and upload the results to ThingSpeak.
At the beginning of the script, the necessary modules are imported, then the address of the ThingSpeak channel is defined. DIO lines used to communicate with the Pmod, as well as global variables controlling communication and data processing, are also defined here. The user-defined functions are responsible for the following tasks:
- Reset and close the used instruments
- Power the Pmod MIC3 and initialize the SPI interface.
- Display error messages
- Read data on SPI
Run the script and display results in Thingspeak Cloud
Open WaveForms and open the Device Manager from the Settings menu, then select your device and open its Network Settings by clicking on the Network button. Note the IP address assigned to your device and close WaveForms. Open the terminal emulator and establish a new Secure Shell (SSH) connection to the Analog Discovery Pro’s IP address. After that, run the following commands to mount the device and run the script.
>>>sudo mount /dev/sda1 /mnt
>>>cd /mnt
>>>sudo python3 ./PmodMIC3_to_Thingspeak.py
The measured noise levels can be plotted against time or displayed on a gauge widget. 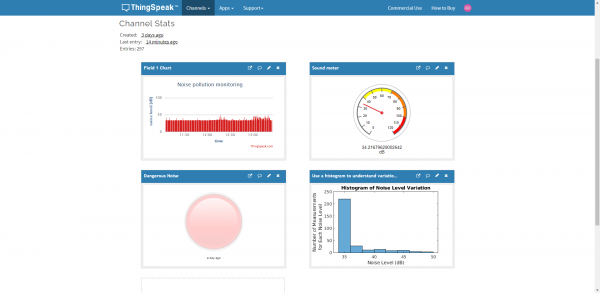 A histogram of the measured values can also be displayed, along with a virtual LED, to indicate dangerous noise levels. One important MATLAB function to use in data processing is thingSpeakRead().
Find the project details and get the source code on the Digilent Reference Page.
Analog Discovery Pro is now available in Elfa Distrelec.